This guide offers instruction on how to capture, edit and upload gameplay images to be used here on the Mafia Wiki. Like most things, there are always multiple ways of accomplishing the same task so this guide will only focus on the basics. If you're in need of more advanced help, an internet search will likely serve you better.
Capturing Images of Gameplay
The three major platforms for gaming are PlayStation 4, Xbox One and Steam for PC. Instructions on capturing screenshots can be found below.
Removing the Player Character
The player character should not be included in images unless it's the subject of it. This can be difficult because the Mafia Series games are third person and don't have an option for first person view. You can get around these restrictions by either taking the image from inside a vehicle using the front view option or by taking cover next to a vehicle or other object and turning your camera in the opposing direction.
Capturing Images of Video
To capture an image from a video you will need some form of PC based screen capture software.
Print Screen
In Microsoft Windows, the most basic function to accomplish this is to use the "Print Screen" key, typically located after the F12 key on PC and laptops. You will then need some form of image editing software, again the most basic of which would be Microsoft Paint. Once you open Paint, use the paste function to add the captured image into the palate.
Snipping Tool
Microsoft Windows 7 and above have a utility called the "Snipping Tool". Typically found under Start, All Programs, Accessories. Once you click on the utility simply press and hold the left mouse button and drag the cursor over the area you wish to capture then let go. You may now save the image to your computer. More information on the Snipping Tool may be found here: Snipping Tool.
Jing Utility
Jing® is a free computer utility that lets you capture basic video, animation, and still images then save or share them on the web. Once installed simply click the Jing overlay then press and hold the left mouse button and drag the cursor over the area you wish to capture then let go. You may then position or crop the selection and once you're satisfied with your image you may save it to your computer. You may also select a hotkey to simplify this process. To download Jing click this link: Jing Download.
There are a multitude of other screen capture utilities available on the internet, both free and paid, you're free to explore these at your leisure.
Cropping Images
Once you've captured an image it likely needs to be cropped before you upload it to the wiki. The subject of the image should be centered and the HUD should not be included. This can be difficult on games that don't have an option to turn the HUD off, so cropping it out is necessary. When capturing images, try to center the subject so that it will be centered once the HUD is cropped out.
Microsoft Paint and the Snipping Tool mentioned above will function to crop an image, but they're rather crude and offer few other photo editing features. There are a multitude of free and paid programs available to download or you may use an online editor like Pixlr.
Uploading Images
Using the file upload tool
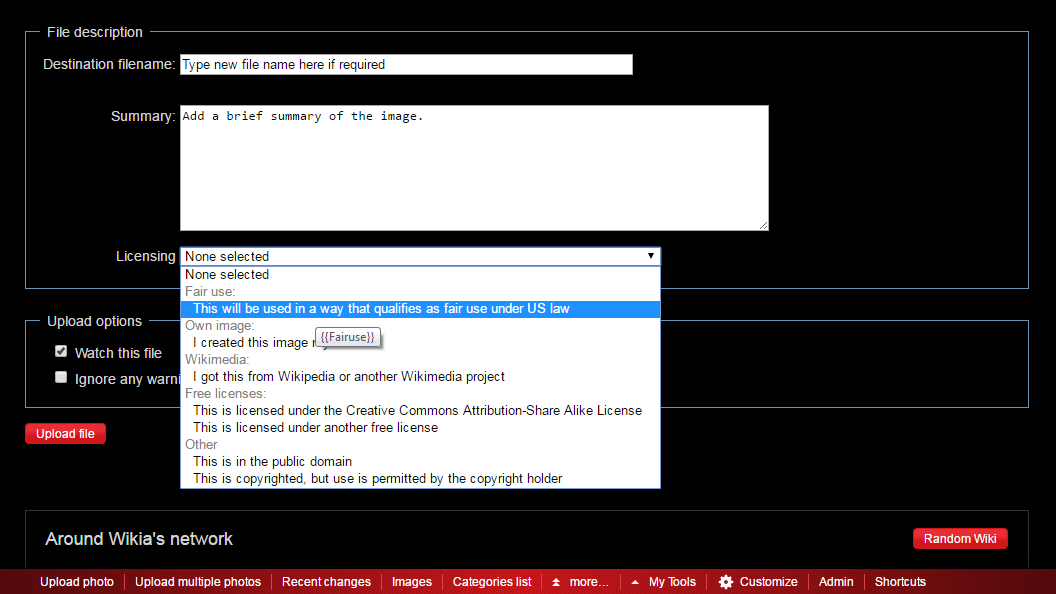
Once your image has been captured, downloaded to your computer and cropped, it's time to upload it here. The first step in uploading an image is to bring up the proper uploading tool. The one located within the page editor doesn't have the necessary options needed to do the job correctly. You're perfectly free to use it, just bear in mind that you will have to go back and manually add the missing information to the file afterwards.
The best way to upload an image is with the Single Upload or Multiple Upload tool. You can add these tools to your lower toolbar by clicking the customize button. When using the upload tool, you have inputs for the following.
- Destination file name: This allows you to give the file a new name.
- Summary: This section is where you add the file description.
- Licensing: This is where you select the proper copyright license.
Once you've completed the above, click the Upload File button and you're done. Remember to add the image to the proper category once it's uploaded, you can see a complete list of available image categories here: Category:Images
For a more comprehensive explanation of our image policy please see our Media Policies page.